Updated November 2017 after the withdrawal of CrashPlan for Home.
.
Introduction
This post gives detailed information on the options for backing up to the cloud. For an overview of the various options of backup and the reasons for using them, see my summary post Backup for Photographers.
Why cloud backup?
You should have an off-site backup as well as local ones. This can be taking hard drives to store in someone else’s house, but those backups are not likely to be very up to date. Cloud backup is now easy and affordable so is often a better alternative. You do need an unlimited data plan with your ISP though, such as iiNet provides in Canberra.
Why you still need local backup
It’s very slow to transfer large amounts of data to the cloud. Getting back a few files should not be a problem but retrieval of large amounts of files is also slow, though not as slow as the upload.
Also, as with any media choice, local or Cloud, there is some risk your file may be missing or corrupt when you come to recover it. Cloud companies have also been known to fold in the past (though hopefully not the ones we will mention).
Cloud storage vs cloud backup
Cloud backup is not to be confused with cloud storage. Companies like Dropbox offer cloud storage and you can copy files in and extract them or share them, but there is no interface for file backup. There are many options for free cloud storage but most of them don’t offer much space. The largest I have found is Mega (founded by the infamous Kim DotCom) which offers 50GB free.
The cheapest cloud storage for larger amounts appears to be Amazon Glacier or Backblaze B2 which cost 0.5 US cents per Gigabyte per month. That corresponds to $A8 per annum for 100GB, $40pa for 1TB and $200pa for 5TB. Glacier costs from 0.3 US cents per GB for a slow download (wait 5 to 12 hours before anything happens) to 3.6 cents/GB for a download with little delay. Backblaze B2 costs 2 cents/GB for a download with little delay.
Cloud backup options
For backup to the cloud you need backup software as well as a cloud storage repository. These are usually integrated but can come separately. There are many alternatives out there. Here are a few that I see as the most likely options.
If you have small amounts of data to back up – up to around 1TB, the cheapest option is Cloudberry. This is an interface for backing up to the cloud but does not include storage. There is a free version of Cloudberry, or one with encryption for a one-time cost of $A40. Then you need to add storage from Amazon Glacier or BackBlaze B2 at the costs outlined just above, or any number of more expensive alternatives. This may be a cheap option but is not an easy one. You need to negotiate the complexities of setting up both Cloudberry and the storage choice.
If you are already using Acronis suscription model for your local backups, extending to Cloud backups may be a viable option (It’s not available with the cheaper perpetual license). Acronis is fast, easy to use and extremely configurable. Additional cost per annum of backup to the Cloud is $A3 (50GB), $A14 (250GB), $A30 (500GB) and $A60 (1TB). Beyond that, other options are more cost-effective.
What used to be Lightroom CC is now Lightroom CC Classic. There is now a new cloud only program confusingly called Lightroom CC. This offers expensive web storage of images, at $US120pa for up to 1TB, $US240pa for up to 2TB or $US500pa for up to 5TB. So this is not an option for cloud backup and since you have to commit to annual plans, noy an option for temporary storage while travelling.
The two most likely candidates are BackBlaze and CrashPlan for Business, both of which offer unlimited storage. I have eliminated IDrive, SpiderOakOne and SugarSynch (too expensive and too little storage) and SOS (too expensive). I also eliminated Carbonite which offers similar functionality to BackBlaze but costs more. The main difference between BackBlaze and CrashPlan for Business is in data retention. BackBlaze deketes deleted files and previous versions of files after 30 days whereas CrashPlan holds onto the indefinitely, according to your settings. BacvkBlaze costs $US50 per year whereas CrashPlan for Business costs $120.
CrashPlan had a product CrashPlan for Home that offered superiorfunctionality to BackBlaze at around the same cost but this was discontinued in mid 2017.
Why Unlimited Storage
Photographers are likely to have large amounts of files and unlimited storage is likely to work out cheaper, especially when including future requirements.
Also, you could be backing up specific directories locally using multiple backups with different criteria. This creates the possibility you may forget to define some backups for new projects so you end up with holes in your safety net. Having an unlimited Cloud backup means you can back up everything and solves that problem.
BackBlaze
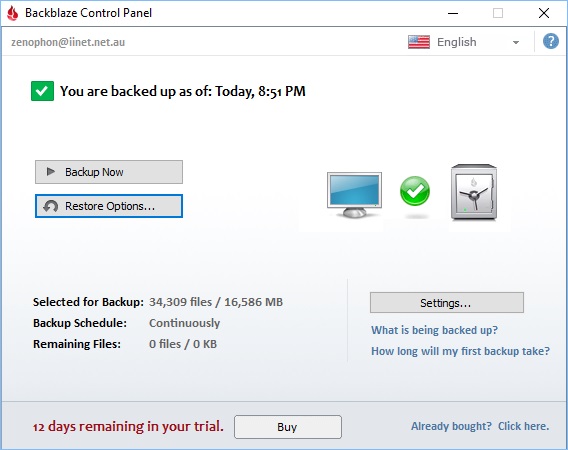
Backblaze is cheap and simple. Basically you just set it going and it backs everything up. On the main screen you simply have options for [Backup Now], [Restore Options] and [Settings]. There is also a Help button at top right.
All you really have to do is click [Settings…] to select which drives to backup and let it do its thing. However, you might want to specify a drive other than C:\ as temporary data drive because Backblaze temporarily stores copies of large files there while uploading.
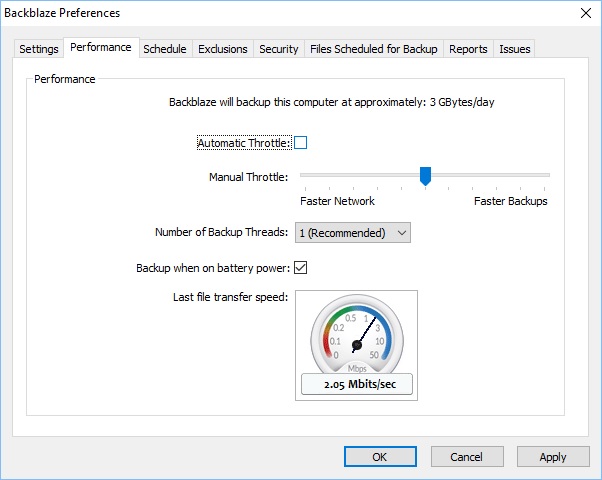
On the Performance tab you can let Backblaze automatically adjust the upload overhead, or adjust it manually in various ways. Here, I have unchecked [Automatic Throttle]. You can use the slider to increase backup times but if you take it too far, you may slow down your whole home network. You can also increase the number of backup threads and you should do it slowly, one day per increment, and observe results.
On the Schedule tab, scheduled upload is usually continuous but you can make it daily or on demand.
Backblaze does not back up system files and has a number of folders and file types it excludes by default. You can specify additional folders to exclude but you can’t do it the other way and define folders or files to include.
Restoring files is more complex than backing them up. You login to the web site to request the restored files. Then you can download your files as a zip file. Next you have to work out what to do with them. They come inside the zip archive in a folder structure corresponding to the directory structure. You have to manually work out where to copy them to from there – and you need enough space to have two sets of those files until you’re finished.
Alternatively, you can ask BackBlaze to send you a hard disk (up to 4TB; US178). You can get a full refund on the hard drive if you return it within 30 days and pay return postage only. After you make the request, it takes them 2 to 4 days per terabyte for them to post it plus 3 to 4 days in the post. So probably: 4 to 6 days for 500GB; 5 to 8 days for 1TB and 14 to 24 days for 5TB.
I read a review that said that if you tweak the Settings/ performance values, BackBlaze should run about the same speed as CrashPlan. If this is the case, and based on my download test for Crashplan (though my PC and network speed may be quite different from yours), direct download may be quicker than a disk for up to somewhere between 1TB and 2TB download. However, without tweaking those settings, my current download test is running 25 times slower than my last CrashPlan download test. In any case, a disk may be more practical if you’re short of disk space. If you do go for a disk, you can still be recovering your most important directories while waiting for it. Bear in mind that your whole download choice has to complete before you can access and copy any files.
Backblaze is cheap and simple but there are a few drawbacks that Crashplan does not have.
- That restore process is a handicap for me though the hard disk option could be useful for large data restores.
- You have to copy the files manually from the zip file to your final destination
- You can’t access any files until the zip file has finished downloading
- Restore seems extremely slow with default settings.
- BackBlaze does not support backing up files from a NAS (i.e. a box of disks on your home network).
- It allows backing up from external drives but deletes the files if the external disk is not connected for a month.
- Though it claims continuous backups, it may take two or more hours to notice a new or changed file.
- It lacks a History screen to allow you to accurately determine backup durations and speeds.
- It allows only 6 versions of files and removes versions after 30 days.
CrashPlan
So that brings us to CrashPlan for Business, superior but much more expensive. You can see on the main screen that I have a backup running. It shows details of how that is progressing. You can also see the folders or directories involved in that backup.
How did I do that? Very simple. First time I opened the screen, there were no files defined. I clicked on [Change…] to define some files and away it went, backing up to the default location of CrashPlan Australia (i.e. the Cloud).
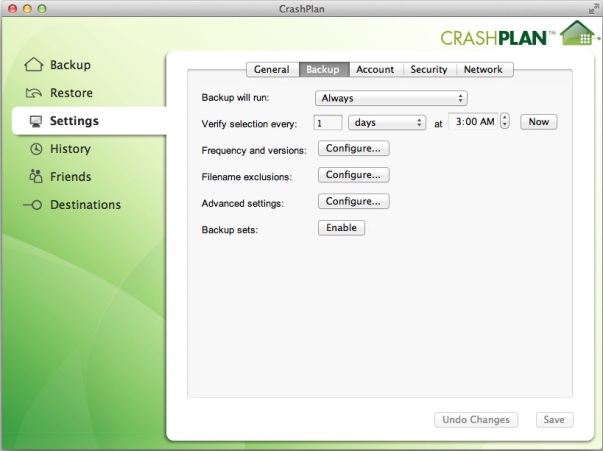
This is the Settings Tab for the backup.
- Default is for backup to run always, but you can make it on specific days and between specific times
- Verify selection is set by default to 3am every morning. This assumes your PC is left on and set never to sleep (Control Panel/ Power Options). Otherwise, you should change the time to when your computer will be on.
- Increase the number of days before verifying to 30 during your initial upload will help it run faster.
- [Frequency and versions]: See the next screen and comments….
- [Filename exclusions] allows you to exclude file types as in BackBlaze. There is nothing specified by default here but your system files are excluded from backup anyway.
- Leave [Advanced settings] alone. They’ll only decrease functionality.
- [Enable] backup sets lets you define backup sets which are for different destinations. Apart from the Cloud, this can be other locations on your computer’s drives, other computers in your home network or friends’ computers.
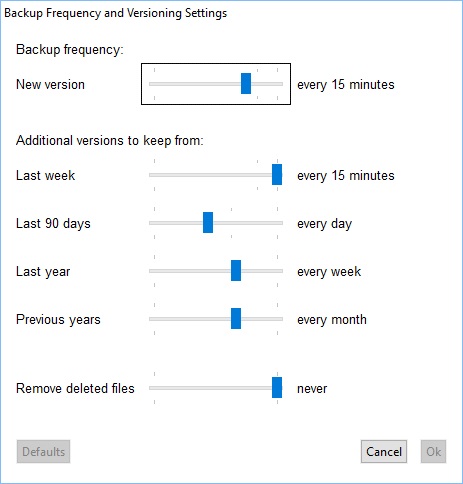
On the Backup Frequency and Versioning Settings subscreen, the first slider sets the frequency of backups, varying from every minute, to every 15 minutes (the default), to every week.
The next four sliders determine how many versions of files to keep and how much to whittle them down as they age, ranging from keeping all versions to jettisoning them after a week.
The last slider is how often you remove deleted files. The default setting is never and alternatives range from every day to every year.
CrashPlan determines whether the computer is in use according to keyboard/ mouse activity. On the General Tab of the settings screen, you can define how long before CrashPlan thinks the computer is inactive, and what percent of CPU to use if you’re away and if you’re using it. You can see it defaults to 80%/ 20%. You could conceivably change that to 90%/ 10% if performance were an issue. Alternatively, you might try 100%/ 90% and then wind the in use setting back if the PC slows. Setting CPU% to zero though is not what you would think; it actually tells CrashPlan to use whatever it wants. Its default upload speeds are good, so there may not be any need to modify anything here.
You can define other computers to backup files to you (as we will see later). The [Configure…] button allows you to change their destination. (The default destination is a subdirectory of C:\ProgramData\).
Setup tips
What to back up? Not system files because they keep changing endlessly, so even though CrashPlan excludes many file types automatically, not your whole C Drive. On your C Drive, perhaps just your Users directory plus any directories you have created for your files. Most user settings are stored under C:\Users but one I can think of that isn’t is:
- Printer profiles: C:\Windows\System32\spool\drivers\color
Also exclude Lightroom previews and cache files from the backup. Lightroom rebuilds them anyway and it slows the backup. You may have the Lightroom catalogue stored somewhere else but by default on Windows 10 and for Lightroom CC these are located at:
- Lightroom previews cache: C:\Users\username\Pictures\Lightroom\Lightroom Catalog Previews.lrdata
- Smart previews cache: C:\Users\username\Pictures\Lightroom\Lightroom Catalog Smart Previews.lrdata
- Adobe Camera Raw cache: C:\Users\username\AppData\Roaming\Adobe\CameraRaw\Database
When setting a huge initial backup, you can define it in sections with your most important directories and folders first.
Restoring files
Restoring files is easy. You can select drives, folders or files and then restore them to their original location or another place such as the default of Desktop. It’s just going to take a long while if you have a huge mass of files, but you can restore your most important files first.
Here are some locations of important settings in C:\Users:
- Lightroom User Print Presets: C:\Users\[user name]\AppData\Roaming\Adobe\Lightroom\Print Templates\User Templates
- Lightroom User Export Presets: C:\Users\[user name]\AppData\Roaming\Adobe\Lightroom\Export Presets\User Presets
- Lightroom User Develop Presets: C:\Users\[user name]\AppData\Roaming\Adobe\Lightroom\Develop Presets\User Presets
- Photoshop Actions (if you’ve saved them): C:\Users\[user name]\AppData\Roaming\Adobe\Adobe Photoshop 2017\Presets\Actions
- Photoshop Actions (otherwise): C:\Users\[user name]\AppData\Roaming\Adobe\Adobe Photoshop 2017\Adobe Photoshop 2017 Settings\Actions Palette.psp
History
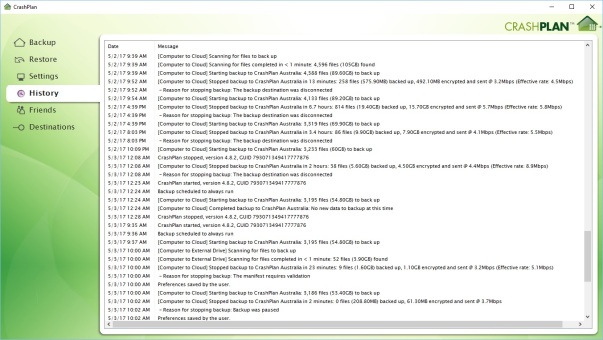
The history screen is very useful. It tells you when your tasks started and finished, and the speed that they run at.
Help and support
There is no Help button to click in the interface but there are help screens available online. Just search for the screen or the issue. Alternatively, here is the support site. You can send emails and there is a Chat Line. Both are quick and informative; only catch is that office hours are 12 midnight to 8am Canberra time.
Capabilities no longer offered
You used to be able to use even the free version of CrashPlan for Home to backup to a disk on another person’s computer. There also used to be a family version of CrashPlan for Home that allowed you do back up multiple devices, including a laptop while travelling. Unfortunately, these are no longer offered.
Backup and Restore Times
Upload to the Cloud depends mainly on your network speed (which can vary) and also on the specification of your PC and what else you are running or doing on it. So the speed I get on my PC may or may not be relevant to what you get on yours and a test I make at one time may give different results at another. Here is a link to test your upload and download speed.
I made a test to see how long it would take to backup a 54.1GB upload with speedup setting implemented (as below). That took 12 hours 37 minutes, corresponding to 23 hours for 100GB, 10 days for 1TB and 14 weeks for 5TB. Download is usually faster so I set a restore going. That took 5 hours 20 minutes, corresponding to 10 hours for 100GB, 4 days for 1TB and 6 weeks for 5TB.
Speeding up the backup
There are a number of things you can do to speed up the backup, especially for a large initial backup.
- I have already mentioned leaving the computer on and setting sleep to never (Control Panel/ Power options)
- In Settings/ General, increase CPU% to 90% both for when user is away and for when user is present.
- Then reduce CPU% for when user is present if it noticeably slows computer down.
- In Settings/ Backup/ Frequency and versions: [Configure…], reduce backup frequency from default every 15 minutes to say every 8 hours
- This reduces the time the CrashPlan spends checking for new versions.
- You could also verify selection of your backup less often.
- You can return CPU % and Frequency settings to default values (or whatever you prefer) when your initial backup is finished.
- However, CPU % when user is present should be at least 10%. If you reduce it to 0%, CrashPlan actually takes that to mean “Do whatever you want!”.
- If you have two different backup programs operating simultaneously and you notice performance issues, it may help to schedule them to run at different times.
Managing Memory
CrashPlan recommends allocating 1GB of RAM for each 1TB of files stored in the Cloud. Default is 1GB. (Actually, it’s really 600MB per TB storage but they allow for expansion).
So far I haven’t encountered any performance problems, though I have only uploaded 380GB of a potential 5.7TB and my computer has 32GB of RAM. CrashPlan is in any case designed to run quietly in the background and not compete for resources. Presumably though, people with old slow PCs and lots of data to backup are more likely to encounter issues.
If you do encounter problems, here are a couple of further things that could help:
- The most resource-intensive activity is file verification scans. Normal backup gets file change information from the operating system and it doesn’t need to scan. So make sure the verification scan only operates when you are not using the computer (Settings/ Backup/ Verify Selection)
- You could set your backups to only run overnight (Settings/ Backup/ Backup will run…)
- You could reduce the amount of data you store on the cloud. For example, you could create “3+” subfolders and move images with 3 or more stars to them in Lightroom, then back up only images in those folders.
- You could have different backup sets for older files and current files with different settings. Different backup sets are usually for different destinations but you could have two for backing up to the cloud.
- On the Settings/ Backup tab, you can set different [Frequency and Versions] settings for each backup set, but if you have two sets backing up to the cloud, only the settings from the highest priority set will apply. So that’s of no use here.
- However, you can set Backup times and Verify times for two sets backing up to the cloud and they will apply.
- So one set with your old files that change very infrequently would seldom backup while the set with your current files would backup often.
- At the extreme, you could set your old backup set to back up for one minute on Sundays (i.e. not at all) and verify it very infrequently.
- When you finish a project and want to transfer files from the current to the old backup set, define that folder in the new backup set, click Verify [Now] for that set, and delete them from the current backup set.
- If necessary, you can also pause all backups for a specified period by right-clicking on the CrashPlan Tray at the right of you Menu Bar and choosing [Sleep…]
Recovering from a Ransomware Attack
Cloud backup can be a valuable way to protect against ransomware attacks. Typically you introduce the ransomware to your PC through clicking on an email attachment or a link. All your files may become encrypted and a message appear on your computer demanding a ransom. We have recently seen the explosion of the WannaCry ransomware. According to Wikipedia, over 230,000 computers in over 150 countries were infected within the first day.
Norton now protects against WannaCry and other known ransomware. Acronis also does this by preventing malicious changes to your Master Boot Record and to your backup files. Probably nothing can be 100% successful against new ransomware algorithms. It is also important to have your operating system up to date.
If you get hit by something like WannaCry, you’re probably going to need to reimage your PC. If it has spread to your home network, you may need to reimage all the PCs on your home network that were turned on since the attack began. Then you need to restore files from backup.
If you have an online local backup, your backups are probably encrypted too (not merely the files they contain). Offline backups to hard disks may be OK but are are more likely to be out of date than your Cloud backup.
The standard approach to Cloud backup with CrashPlan is that you back up data files (images, video, music, Word files, Excel files etc.) and not system files. So when you restore files from the Cloud after reimaging, the danger is not reintroducing the ransomware Trojan, it is reinstalling encrypted files. If you find this happens, you just need to restore files from a date earlier than when the attack started. CrashPlan will show you the files you have available to restore at a certain date in a directory structure, including the file names. So if you see encrypted file names, you need to go to an earlier backup and if you don’t, they should be all right. The same applies to BackBlaze but you can only go back 30 days, which might not be enough.
If the ransomware attack means you have lost your CrashPlan password and you have the standard security level, then CrashPlan support can help you reset it and you can access your backups. This also applies to BackBlaze. However, if you are using the higher Crashplan security archive key or custom key settings, you will need to know that password or you won’t get your files back. In any case, it may be as well to have your passwords on a USB stick, a disconnected hard drive or a piece of paper.
Options for families
BackBlaze and CrashPlan for Business don’t have a Family Plan; you just have to buy more single licenses.
Another alternative may be IDrive, a well-featured program including file synch, file sharing and also free offline backup with unlimited computers for $A93pa, but for only up to 1TB of data, which is probably not very much, especially including future expansion.
Cloudberry plus storage on Amazon Glacier or BackBlaze B2 would be cheaper up to about 4TB but the hassle factor would be much greater and the functionality more limited. If you happen to have a subscription to Microsoft Office 365 Home ($A120pa), that comes with 1TB Cloud storage in OneDrive per computer for up to 5 computers. Cloudberry supports OneDrive so I presume you could connect from Cloudberry to your Office 365 OneDrive online storage.
Summary
Photographers inevitably end up with lots of images and backups are essential. You should have at least two (preferably three) and one should be off-site.
These days it makes a lot of sense for your off-site backup to be the cloud. Your initial backup will be very slow but this is not a problem because it will run in background and you should have two local backups before you start this process anyway.
I have covered some other options above but for most people, Cloud backup will be a choice between BackBlaze and CrashPlan, both of which offer unlimited storage space. Backblaze will suit people who want a very simple choice, don’t mind slow performance if they don’t tweak the settings, and don’t mind a complex restore process. CrashPlan is a better system with unlimited versioning, but is much more expensive.
Links to more information
- CrashPlan – Complete Tour
- BackBlaze – Complete Tour
- Best Online Cloud Backup Service
- How can I backup a LOT of data online?
- Speeding up your CrashPlan Backup
- Adjusting CrashPlan’s Settings for Memory Usage with Large Backups
- Online Backup Reviews
- Best Online Backups
Free free to comment, and to offer or to request information….






Murray, great report and good research. As discussed at last night’s meeting I have concerns about the long term storage to an outside provider.
Firstly, those of us limited to ADSL or ADSL2 do not have the bandwidth necessary to complete a backup within a reasonable time. So during the weeks it takes to complete the first backup we would be advised to backup to an external hard drive. My argument is, once we have done this why not continue with this same process. The benefits, in my opinion, outweigh the requirement to carry out the process regularly and the recovery process is way faster.
For short term storage, such as when travelling, the idea of being able to backup your files certainly appeals. The risk of a memory card being lost, stolen, or somehow failing, concerns me, and I would consider backing up to ‘the cloud’ if I could get a fast enough internet connection while travelling.
For long term storage, however, there have already a number of failed cloud providers. While this may be a low percentage it will be of little consolation if the provider you choose happens to be one of them. The general advice is to store you data with multiple providers. This increases both the complexity and the cost.
In your blog you talk about the means of retrieving your data in the event of data loss at your PC. One of the ways you listed was to request a hard drive, and that you could return this in 30 days with minimal cost. I had a Western Digital hard drive fail recently that was part of a fault tolerant array. I therefore did not lose any data, but I had to return the faulty drive to Western Digital in Vietnam in order to receive a replacement under warranty. The cost of sending this Hard drive overseas was $65, and then it still took 2 weeks for the postal services of Australia and Vietnam to deliver it to their factory. The cost is not low, and there is a real risk of exceeding the 30 days, especially if that time starts when they send the drive to you.
The current system I use is a NAS. The NAS uses a modified RAID 5 storage system together with a hot spare. This means when my hard drive failed recently the hot spare was automatically added, and the only period of time my data was vulnerable was during the time it took for the NAS to include the hot spare in the array. During these few hours, if I had experienced a second hard drive failure I would have lost my data.
As well as the NAS I have 2 other hard drives. One of these hard drives is at my house and the second is off site. Each week I backup to the hard drive at my house and physically carry the hard drive to teh off site location. I collect that had drive and bring it home. As well as these copies of my data I also have a full copy of my files on a separate disk on my home PC.
The backup process is run overnight when I am sure I have no open files, and after copying it does a verify, reading the data on the backup disk and comparing it to the original.
I appreciate this process is not automatic, and if my house burnt down I wold lose up to a week of files, but if my house burns down this is probably the least of my worries.
Questions I would have for any alternative are:
1. Cost
What is the cost of storage?
What is the cost of data retrieval?
What is the extra cost of my Internet connection?
Will the cost change over time?
2. Time
Time to backup?
Time to retrieve data?
3. Data integrity
How do I know the data made it to the end point? Is there a verification process?
How do I know my data will still be there when I need it?
4. Open files
If the system I choose backs up data while I am using it how does it handle open files?
Does it skip them until next time? This is a common practice with backup software and is especially relevant for databases such as you Lightroom catalogue. If this file keeps getting skipped then you have missed backing up an important part of your workflow.
If it doesn’t skip it then what it saves will be unusable as the backup copy is likely to be corrupted. I know that skipped files will probably be reported to a log file but how many of us would read this more than the first couple of times.
5. System files
With external hard drives I can take a snapshot of my system, and store that with my data?
LikeLike
Thanks for response ans detailed queries, Tom.
First, I’m not advocating that backing up to the Cloud should be your sole of primary backup. Backing up locally will be much faster to backup and restore.
My primary data drive is a RAID 10 and my main backup is to a Drobo, which is also RAID-like. I also have backups on hard disks but I have not previously had remote backups. I have sometimes had to retrieve from the second-level disks and twice I have had a system failure and found I had holes in my backup system.
The advantage, then of unlimited backup to the Cloud is that it backs up everything so there are no holes in your backup, it should operate seamlessly under the surface with no disruption, and your backup is always up to date.
Most places I travel to I’m lucky to have an internet connection at all. However I suppose Cloud backup while travelling might be possible if you travel in Europe or North America and especially if you stay in one place for a while.Even if you don’t get everything backed up, whatever you do is better than nothing. In that case, unless you already have a CrashPlan Family subscription, you copuld purchase a monthly one for your laptop and terminate it when you return and have all your files on your PC and backed up. (I will update the article with his).
I’m aware there have been failed Cloud providers but I don’t think that’s likely with CrashPlan, which is a prominent player and has been around for some years. I don’t agree with multiple providers. I just think you should have your data securely backed up locally as well.
Retrieving data by a hard drive is offered by BackBlaze but not by CrashPlan, which is my preferred choice. That 30 days is the time you have to send it back.
Answers to your questions, specifically in terms of CrashPlan:
1. Cost
What is the cost of storage?
– $A80 per year or $A8.16 per month if travelling with short-term subscription
What is the cost of data retrieval?
– Zero
What is the extra cost of my Internet connection?
– For me, nothing. My iiNet plan at $70 per month gives me unlimited uploads and downloads as well as unlimited local and national phone calls.
Will the cost change over time?
– Probably but based on past events, probably not very much.
2. Time
Time to backup? And Time to retrieve data?
– Refer my estimates under backup and restore times above. For your PC and network speed, download a free 30-day trial and make the same tests for yourself.
3. Data integrity
How do I know the data made it to the end point? Is there a verification process?
– Yes. Settings/ Backup/ Verify selection scans your computer to verify file selection and backup at the interval you specify.
How do I know my data will still be there when I need it?
– Periodically try restoring a file or two. (I’ve seen a recommendation of every Friday 13th).
4. Open files
If the system I choose backs up data while I am using it how does it handle open files?
– CrashPlan on Windows backs up open files using a kind of virtual copy and there should be no problems. (It uses VSS or Volume Shadow Service to be precise). With CrashPlan on Macs there can be inaccuracies. In any case you also have different versions of the files backed up.
Does it skip them until next time? This is a common practice with backup software and is especially relevant for databases such as you Lightroom catalogue. If this file keeps getting skipped then you have missed backing up an important part of your workflow.
– No
If it doesn’t skip it then what it saves will be unusable as the backup copy is likely to be corrupted. I know that skipped files will probably be reported to a log file but how many of us would read this more than the first couple of times.
– No, not on Windows. There may be problems on Macs. There may be inaccuracy on Macs; I don’t know whether there can be corruption.
5. System files
With external hard drives I can take a snapshot of my system, and store that with my data?
– Not with CrashPlan, though you can with Acronis or Carbonite. I use both Windows and Acronis for that locally. I am also intending to install a couple of M.2 SSDs before too long, one for my C Drive. When that happens I will retain my present SSD as an image copy, cloned by Acronis.
Regards,
Murray
LikeLike
One other thing I meant to say: I don’t think it matters if your initial backup takes a long time. You need to have full local backups anyway.The important thing is everything happens in the background with no visible performance effect and when the initial backup is finished, your backup stays current.
LikeLike
[…] For more information see the updated Blog article Cloud Backup for Photographers. […]
LikeLike
[…] For more information see the updated Blog article Cloud Backup for Photographers. […]
LikeLike